Wednesday, June 9, 2021

Fusion 360 Machine Simulation Preview

 In October of 2020, Autodesk acquired technology from a company named CAMplete.  The technology was capable of several functions, one of the most notable was running your CAM simulation in the context of the CNC machine.  When I heard of the acquisition, I was pretty excited because I knew that this would be a great addition to the CAM workflows I was familiar with in Fusion 360 and Inventor.  My only questions were how the functionality was going to be rolled out to Fusion 360 and/or Inventor and what it would look like.

I believe we have seen the beginning of that technology being rolled out to Fusion 360.  There is nothing in the documentation that says this is the CAMplete technology, but it is pretty obvious that the new Machine Simulation Preview in Fusion 360 is based on that CAMplete technology.  

Since this is a preview feature, you will have to enable it in your Fusion 360 Preferences.  At the bottom of the menu in the left pane of the Preferences dialog is Preview Features.  If you click on that, you can then look through all the preview features or filter by Workspace.  You will be looking for the function called Machine Simulation.


Once that is enabled in your Machine Library dialog, you will now see a filter option for Simulation Ready.


If a machine that is simulation-ready is defined in a Setup, you will then see the machine when the Setup is selected in the browser or when you are simulating a setup.


That is all you need to do, you can just program your toolpaths like you would normally do.  I really like this new function.  I think it will give CNC programmers more clarity into what the toolpath will look like when running the program on the machine.

If you would like to see this preview function in action; here is a video demo I created to show how this works.
  

Monday, May 24, 2021

Inventor Feature Presets

With the launch of Inventor 2022, Autodesk added several feature enhancements that you might already be using.  One feature that really isn't new, but is now available in more commands is Presets.  I haven't covered Presets before in this blog and I recently took a deep dive into Presets to understand how they work.  I figured that I would use this opportunity to share what I have learned.

Presets are a great way to save some time if you do the same type of operations, or features, often.  I can say that you will likely find that Presets are offered in certain commands that you may not have a need to leverage them in too.  The last time I checked Presets were available for Holes, Threads, Coils, Sweeps, Insert Frame (from Frame Generator), Surface Symbols (2D drawings), and Weld Symbols (2D drawings).

The idea behind Presets is that I can save a group of settings for a specific feature for future reuse.  One of the first commands to get Presets was the Hole command.  I really wished this was available when I had my last job.  Creating .190 diameter thru-holes was a pretty common feature that I needed to create.  With the use of Presets, I could have created that type of hole and leveraged that every time I needed to create that type of hole.  

Presets can also be standardized and shared across multiple users.  When Presets were introduced, Inventor project files added a mapping to a directory for them to be shared.  


Once you define a preset, Inventor will save a file in that directory for that feature type.


Creating presets is very easy.  All you have to do is set up the feature with all the necessary settings, then you click on the plus sign at the top of the feature dialog.


Inventor will name the preset by combining the attributes of that feature, however, you can customize the name to suit your needs.


From now on, when you want to apply that feature, you just need to select the preset from the drop-down menu.  You will still be able to override any of the predefined parameters.  So you can think of this as more of a feature template that can be leveraged, but you can still modify the parameters after you apply the preset.

If you would like to see the Hole Presets in action, here is a demo video I created.

Wednesday, April 21, 2021

Inventor 2022: Model States Replaced Levels of Detail

 Inventor 2022 has been out for a few weeks now and I have used it a little bit, but I haven't fully migrated to using it full-time.  Today, I had my first introduction to the new Model States function in Inventor 2022.  I had a rough idea of what they were going to be capable of because I read a few articles and saw a few presentations on what Autodesk was looking to add in Inventor 2022.  I will say that I was blown away by how much Model States are capable of.  I was also not aware they are essentially replacing Levels of Detail.

I have been using Inventor for over 15 years and have used Levels of Detail quite often in that time.  In my current job, I teach a class in Large Assembly Management, in which Levels of Detail and Level of Detail Substitutes are a large portion of that class.  In watching a What's New In Inventor 2022 webinar, presented by Autodesk, they were talking about Model States and said how any custom Levels of Detail will be migrated to Model States when the file is opened in Inventor 2022.  This really caught my attention because I just figured that Model States would be a new way of doing some of the things that I used Levels of Detail for in previous releases and that both functions would be available.  I was wrong, Model States have replaced Levels of Detail.

As I was thinking through the new workflow using Model States, I had the realization that Model States will eliminate a frustrating behavior that has plagued Levels of Detail for as long as I have used Inventor.  When working with Levels of Detail and often when having the model and drawing open at the same time, Inventor would eventually give the user an error stating that the current Level of Detail cannot be saved because another one is currently being edited.  


 Model States do not need to be saved as you transition between them, so this should be the end of an error that has driven plenty of users crazy.

Here is a video I made that shows how to use Model States to accomplish some of your Large Assembly Management workflows.


I am excited to learn more about Model States in Inventor 2022.  There are workflows for parts where they can be used instead of iParts.  They also can help in the case of casting and machining workflows.  This is one of the biggest enhancement introduction that I have seen the last few releases of Inventor.

Tuesday, March 9, 2021

Wall Hook Update: ABS Print

I was a little worried to print my wall hook in ABS because I read plenty of posts from makers that said that it tends to warp and split during printing.  Since I already had a spool of ABS, I figured I should give it a try.

The print came out looking great.  The ABS print actually has less visible layer lines in some spots.  That might be because I used a white ABS filament compared to a matte light gray PLA filament.  


I only had one issue with this project.  When I was setting up the project in Cura, the recommended bed temperature for ABS is 80 degrees Celcius.  My printer gave me a couple messages that stated, "Heating Error, Printing Halted, Please Reset.".  I am not sure was caused it, but I will say my printer does that when I run the bed hotter.  So I consulted the specs for ABS and saw that 80 degrees were on the high end of the range.  I tried the print with bed temperatures of 70 and 75 degrees.  In the end, 75 degrees worked out well.

As I write this, I have the printer heating up to run a different project in ABS.  I will have to see if I get similar results.


ABS Hook Installed


Wall Hook In Use


Monday, March 8, 2021

3D Printing a Generative Design Model

In a previous blog post, I talked about design a wall hook for my backpack using Generative Design in Fusion 360.  The goal was to then get the design 3D printed.  Now that I have a 3D printer I am able to print this design.  I purchased a Creality CR-10 S5 and this was one model that I used to learn all I needed to know about how to get good 3D prints.

Creality has its own slicer, but I have read that a lot of Creality owners use Cura, which is Ultimaker's slicer and free.  I wasn't sure which one would be best, so I bounced back and forth between the two for a while.  I have since settled on Cura because it gives more options than Creality's slicer.

Cura will take in an STL file that I can export out of Fusion 360.  There are two ways to get the STL file out of Fusion 360.  I can either use Export or 3D Print to accomplish this.  If I use 3D Print, I can send it directly to a 3D Print Utility, I tried this once, but I don't get to save the STL to my chosen location or even name the STL.  So I just save it to a file then load it into Cura myself.  I have also learned that it is best to switch your document units to mm before using the 3D print command.


Export Dialog

3D Print Dialog

Once the STL file is exported, it is just a matter of opening Cura and inserting the STL into a project.  I have used a few slicing programs over the years and they are all pretty simple to learn how to use.  You just need to position the model on the build plate where you want it.  In my case, I had to rotate it so it laid flat on the build plate, which will minimize the number of supports it would need to build.

The first time I printed this model, I realized that it is way too small.  I do have a little bit of an issue with picturing my CAD designs at full scale.  So the second time I ran this, I used the slicer to scale the model 2x, which in retrospect seems a little too big.  I know this wasn't the proper technique.  I just wanted to quickly try it at a larger scale.  The main reason this is an issue is that the holes are twice as large.  I am okay with the scale of the rest of the model, I might have to use washers when I go to actually put this part into use.


When I was going through the Generative Design study, I chose ABS as the material for this part.  That was solely based on ABS being in the material library and PLA was not.  When I bought my printer I bought a spool of ABS and a couple spools of PLA.  The versions of this above were printed in PLA.  The larger one feels sturdy enough to use.  I used PLA to print this for two reasons.  First of all, it was already in the printer.  Secondly, now that I have a printer I have read that ABS is harder to print.  I was curious about which material is considered better, so I did a little research.  I discovered that PLA is actually stronger but more brittle.  ABS is more heat resistant, which requires higher bed nozzle temperatures.  It is very prone to warping.  

After read about the pros and cons of each, I feel that PLA is better for this design.  However, I do have a spool of ABS and I think it will be worth trying to print this in ABS just to see how it comes out.   

Here is a video tutorial that shows the process.


My First Month with a 3D Printer

I have been wanting a 3D printer for a number of years now but wasn't sure how much use I would get out of it, so it remained a "wish list" item.  Then recently, we realized that it could be used to make 3D stencils for my wife's furniture refinishing business. Initially, I was looking at smaller printers, but since my wife wanted to make decent-sized stencils, we needed a larger printer. I started looking for affordable printers, with a larger printable area, and good reviews.

After several months of research, I landed on the Creality CR-10 S5.  It has a 500 mm x 500 mm x 500 mm build area.  It was within our budget and had many good reviews on Amazon and YouTube.  So I ordered it and it took about two weeks to arrive because the printer was out of stock when I went to order it.

I was very excited the day it arrived. I knew it would take a week or two to learn all the intricacies of the printer and get it tuned for easy use. That was a little bit of an understatement. It only took about 15 minutes to assemble and get working. However, it took a bit of time for me to figure it out. There are plenty of places to learn about how to 3D print, but I was confident in this being an easy machine to use that I didn't bother watching those videos and just jumped right in. It took me about a day to get a completed good print.

My first issue was bed leveling.  The first problem is that I didn't bother leveling it properly.  I was too excited to print and I didn't quite understand the process, so I half-heartedly leveled the bed.  Once I learned how to do it properly, I developed a pretty good system and now  I check my bed for levelness several times a week.  I have seen several users highly recommend the BLTouch auto-bed leveling system.  I am a little intimidated by the process of installing that, so I am holding off at the moment.  I feel that I have a pretty good system and have the bed in a good situation.  I can say that the table I had the printer on originally was not a good table.  It was older and I think I was fighting bed levelness issues because the table was not truly level itself.  I switched to a different table and my bed leveling issues were not as bad.

Bed adhesion was also a problem right away.  This printer came with a tempered glass bed.  I thought that was great because I have read about people costly have to change build plates.  My mistake here was that I thought that the glass was designed for the filament to stick to automatically.  After just a few minutes of research, I discovered that I was wrong.  You need to do something to the bed to help the filament stick.  I chose glue sticks, mostly because we already had that in the house.  Those have worked more often than not.  I have had a few projects that still don't stick well in the corners.  However, this printer has a large print area and I am not sure if the outer corners are getting hot enough.  I have read about people using hair spray, so I tried that and it didn't work as well as the glue sticks.  I also tried covering the bed with masking tape.  That didn't work well for me.  So I think I will stick with the glue sticks.

One issue that I feel I finally have resolved is the issue of the proper bed to nozzle distance.  It also plays a part in my bed adhesion issues.  I was following the advice I have seen online of sliding a piece of paper under the nozzle and when it slides freely then I have proper spacing.  I was still having some slight adhesion issues after doing that.  What I tried this past week that seemed to make a difference is that I would still use the piece of paper.  However, I adjusted the bed to the point where I could feel the paper catching a little.  Also, I could see the nozzle scar the paper just a little.  I had done that in the past and the nozzle was so close to the bed that my first layer was not the right thickness.  So to compensate, I just used the settings in the printer to then move the nozzle up 0.1 mm.  Since my layer height was 0.2 mm, it is essentially a half step.  This has helped immensely.  In previous prints, I would find that the first layer was inconsistent, some spots would be the full layer height, and others spots would be only a partial thickness.  My last two prints had a very consistent first layer.

I know that this sounds as if this has been a challenging month, and in ways it was.  My emotional state would fluctuate from ecstatic that my prints were going well to feeling like I made a mistake buying a printer.  Sometimes that was during the same print.  I really have enjoyed having the printer and feel like I have learned a lot.  If you are going to buy, or have just bought your first printer, hopefully, you can learn from my mistakes.  

I can also say, that I have learned that fine-tuning your printer can be as unique as people's taste in food or music.  What works great for me may not work well for you.  I tried to find optimal settings for bed and nozzle temperatures.  As I tried to replicate those, I found that I have had to run mine a little hotter than some recommended settings.  Maybe as I get more confident, I will start adjusting those down.  I have already started to tweak my normal bed temperature down because I was trying to compensate for bed leveling and adhesion issues.

I do plan on sharing some more lessons I learn as I go about doing more 3D printing, but for now, here are some pictures of my failures and successes.

3D Stencil

Church Window Decor

Wall hook that I printed with a bad extrusion feed rate setting

An example of my bed adhesion issues

My first successful print, the obligatory 3D Benchy


Monday, January 25, 2021

A Generative Design Story

Over the last several months, I have really worked to learn all I could about Generative Design in Fusion 360.  However, there are only so many tutorials and sample files that you can work on.  I wanted to use Generative Design for a real design project, but my job doesn't always provide me opportunities to work on design projects.  So I decided to create one of my own.  I figured I could find some product I could use at home or work that I could redesign with Generative Design.  I decided to use Generative Design to create a hook for me to hang up my laptop backpack.

In my home office, I really don't have a place for my laptop backpack.  I was considering going out and getting a 3M Command hook, but I thought designing my own with Generative Design and 3D Printing the hook would be more fun.

When using Generative Design, we have to define several elements:

  • Preserve Geometry
  • Obstacle Geometry
  • Load Cases
  • Manufacturing Methods
  • Materials that we are considering making this design out of
Preserve Geometry
Preserve Geometry are solid bodies that will be part of the final design.  For my hook, I figured that the preserve geometry would be the area around the two mounting holes and a lofted shape to hang my backpack on.  Once identified as Preserve Geometry bodies, Fusion 360 will display them in green.  Below is a screenshot of the preserves from my wall hook.


Obstacle Geometry
Obstacle Geometry are solid bodies that represent areas that the new geometry has to avoid.  It can be mating components or an area that needs to be avoided.  For my hook, I created a simple representation of the wall that the hook will be mounted on and the handle of my backpack that will hang on the hook.  Fusion also has a specialized tool called Connector Obstacle.  The purpose of this command is to create obstacles for mounting hardware and tool clearances.  In my case, I used Connector Obstacles to represent the mounting screws and the necessary clearance to allow a screwdriver to place the screws.  Once identified all Obstacle Geometry will be displayed as red.  Below is a screenshot of the obstacles from my wall hook.


Load Cases
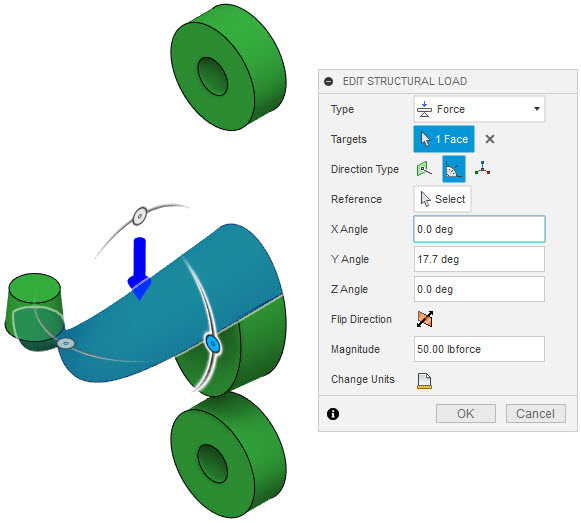
The Generative Study will need one or more load cases defined.  These contain structural loads and constraints that represent the forces that the part will encounter in the real world.  In this study, I have one Load Case.  My constraints are fixed constraints that will hold the part to the wall.  I have two loads, one of which is gravity.  The other is a static force on the surface that the bag will be hanging from.  Initially, I weighed my backpack to get the force accurate to reality.  I used 15 pounds.  My first few attempts to solve the study failed.  I realized that the force was too small for Fusion 360 to solve the study, so I upped the value to 50 pounds.  This will over-engineer the part but isn't necessarily a bad thing in this case.


 Manufacturing Methods
Generative Design is capable of creating parts with several different manufacturing methods in mind. The idea behind this project was to create something with Generative Design and follow it all the way through to a physical product.  With this product, I figured 3D printing or 3-axis milling would be the best methods.  I don't have access to either type of machine, however, I figured it would be easier to find someone to 3D print the part for me, so I chose that method.  There are a couple parameters that will be considered when using Additive.  We can evaluate different build directions as well as account for Overhang Angle and Minimum Wall Thickness.  When picking orientations, you need to consider the X, Y, and Z orientation of the model.  In my case, I used Y+ and Y- because the back face of my part is flat and is on the XZ plane.


 Materials
Since I chose 3D printing as the manufacturing method, I should pick a material that can be used in 3D printing.  PLA is one of the most common materials for 3D printing but is not in the Material library.  I could find the material properties of PLA and use those to define PLA in Fusion 360.  Another option would be to pick a different material.  ABS is part of the material library, so I chose to use that material for this study.


After all of the criteria are identified and entered, it is just a matter of solving the study.  Depending on how many Load Cases, Manufacturing Methods, and Materials I choose, Fusion 360 could take a couple hours to fully solve the study.  However, the software will display iterations of the solutions as they are completed.  In my case, it didn't take long to solve my Generative Study, since I only had one Load Case, one Manufacturing Method, and one Material.

As the results are displayed, you can look through the possible designs and different attributes of each.  As you find designs that you want to further evaluate, you can export them to their own design.  My first time through, I ended up getting this.


I realized that I over-designed the hook portion, which was identified as a preserve.  I decided to modify the preserved section of the hook and ended up getting this.


I think this came out looking pretty cool and  I am excited to get this 3D printed.  Check back here in a few weeks after I have a chance to get this printed because I plan on creating a post related to the 3D printing of this part.

If you want to see me walk through the design, here is a video that walks through the process.