Friday, June 9, 2017

InstaVR App Builder

This blog has been dedicated to CAD and other topics I find interesting.  One of my latest passions is Virtual Reality, or VR.  I don't own or have access to an Oculus Rift or HTC Vive, so I have really explored what is available through Google Cardboard.  I really like the fact that I have a VR capable device with me all, the time in my phone.  Because of this, I have become a little bit of a "Cardboard Junkie."  I have two of the plastic molded style and two of the paper-based style.

You probably have noticed that all my product references have been to some Autodesk product.  Since I work for an Autodesk re-seller, most of my time is spent in their products.  However, a few weeks ago I stumbled upon a company named InstaVR.  I think they offer a really cool service, and wanted to share that information with all of you.

Their goal is to make VR easy and accessible.  If you have 360 photography, stereo panoramas, and other similar content, you can build your own custom VR app for Andriod or iOS.  You may remember one of my previous blog posts about rendering stereo panoramas using Inventor, Revit, and InfraWorks.  I was able to load those images into InstaVR's easy-to-use web interface, and get an app that I could distribute to customers.  My initial attempt took about 30 minutes, with the help of the InstaVR tutorials.  The most difficult part was identifying the format of my stereo panorama, so InstaVR could translate it into the experience properly.  In my first app, I  linked three different environments together.  All the user had to do is set their view at a specific spot to jump to the next scene.

In my opinion, the biggest strike against stereo panoramas is that you cannot move around because the image is static.  It didn't take me long to realize that I could minimize that loss by creating a series of stereo panoramas of the same model and then stitch them into one experience with InstaVR.

Here is a link to the app I created with using this approach.


Please note, if you want to install this app, you will have to go to your phones security settings and allow apps from unknown sources.

InstaVR does offer the ability to insert hotspots that can be linked to videos or images.  You also can add music or voice-overs to be played in the experience.  

If you are interested in this service, InstaVR offers two types of accounts; Free and Pro.  If you have a free account you can make apps, but they will just have an InstaVR splash screen and water-marks on your images.  There is also a limitation to size and output types, when you have a free account.

Here is a screen shot from my app.


I really like this service, it is the closest I have come to building a true VR experience without using a gaming engine, like Autodesk Stingray.  If you are interested in VR, but are struggling to get started, this is a very easy away to begin making VR apps.


Friday, May 19, 2017

Updated Inventor Presentation Environment

I may be a little late with this news, but this is a topic that I felt deserved an entry into the blog.  In Inventor 2017, Autodesk redesigned the Presentation Environment, or in other words IPN files  I guess, this would be news for those of you that skipped 2017, and just installed 2018.

For any of you that have used Inventor Publisher, which was retired after the 2016 release,  the redesign probably feels similar to Inventor Publisher workflow.  Autodesk decided to move Inventor Publisher functions into Inventor.  Now, the new IPN files do not replicate everything that Inventor Publisher did, however, the Timeline and Snapshot views are very similar.

Personally, I like the new Timeline workflow.  It is already more inline with the Inventor Studio timeline than the old presentation files.  I feel that it is easier to see the order of operations and easier to edit than the old way.  One function that I use now, more than in the old method, is Capturing the Camera, or previously Precise View Rotate.  It is so easy to reorient the model, and click Capture Camera.  Also, the fact that it creates a Timeline element for the camera rotation makes it easy to edit the movement and time it right in the animation.

I had to create a few IPN files to fully understand the new workflow, but now I love it.  However, I will say that it took me almost a year to find one setting that was bugging me.  Under the old method, users would pull the model apart and the animation would show the assembly of the model.  In the new environment, after the tweaks are made,  the animation shows the model being pulled apart.  Then a few months ago, when I was publishing a video, I noticed an option that would allow you to record the animation in reverse (see image).  Thus, giving me an animation in-tune with the old method.


For those of you that may not have seen the new Presentation Environment in action, or are still struggling to understand how it works, here is a video that shows the new animation and snapshot workflows.

Friday, April 28, 2017

Autodesk Uninstall Tool

It is that time of year again, where the new versions of Autodesk products are available for download and install.  Which can be great and exciting to see what new features Autodesk has added to your favorite products and to see what annoying bugs have been fixed.  However, this time every year users also start considering if and when they should uninstall the old versions of the products they use every day.  Most users don't uninstall them because it is a pain to use the Window's Control Panel to uninstall all of the old versions product-by-product.

Did you know that about 4 years ago, Autodesk began including an uninstall tool with the suite installs?  Initially, it was only for that year's release, but has evolved to a tool that can uninstall anything and everything that is Autodesk related from your PC by selecting programs from a list and hitting "Uninstall."

The Autodesk Uninstall Tool is found under the Window's Start Menu, under the Autodesk folder.  The program itself it not very flashy, but will list all Autodesk products that are currently installed.  All you have to do is select the products to remove and click "Uninstall."  The utility will uninstall each selected product.  This is definitely my preferred method to having to use the Window's Control Panel to uninstall everything program by program, which when you are dealing with a suite or Industry Collection can be a lot of work.

Here is a quick video that shows how to use the Autodesk Uninstall Tool.

Thursday, March 2, 2017

iLogic: Driving the Model from the Drawing

I was teaching a class the other day when a student posed an interesting question.  He wanted to know if there was a way to drive an Inventor model from the drawing.  In the workflow he was trying to create, a sales person could generate proposal drawings by entering the needed parameters.  This way the user didn't even have to open the model.

I thought about ways to make that happen and iLogic seemed to be the easiest solution.    I was not 100% certain that I could get the drawing to update properly when the parameters were passed, so I wanted to test.  While testing, I found a way around that if the model does not cooperate.

The setup is simple.  You create a part or assembly that is driven by parameters, a typical iLogic workflow.  You then just need to create the same parameters in the drawing.  Then you can create a rule that passes the parameters between the drawing and the model.

Here is some sample code:

modelName = IO.Path.GetFileName(ThisDrawing.ModelDocument.FullFileName)

Parameter(modelName & ".RailLength")= RailLength
Parameter(modelName & ".RailHeight") = RailHeight
Parameter(modelName & ".Color") = Color
Parameter(modelName & ".NoIntermediatePosts") = NumberOfPosts

iLogicVb.RunRule(modelName, "Update")

The first line finds the oldest view on the drawing and grabs the name of the model represented in that view.  This becomes important when using Copy Design, Replace Model Reference, or some other method that might change the model referenced in the view.  The file name is how the model is listed in the browser, which is how iLogic identifies the model.  The next four lines pass the drawing parameters to the model.

The last line is a way to get the model to update, if it does not automatically update.  It is a way of running a rule in the model that is there solely for the purpose of updating the model.

Here is a Screencast video where I show how this works on a sample model.


I will state that I was verifying this on several models.  I found that models that were using a component from the Frame Generator seemed to not update automatically, and didn't always respond to the extra rule that forced the update.  So any model that is using a Frame Generated component may need some extra effort to get updated.  I still have not found a foolproof way to accomplish the needed updates. 

Monday, February 13, 2017

VR for Total Beginners

I still remember when Virtual Reality (VR) became a big deal in the 1990s.  It's kind of funny how it seemed to go away for a while.  There really wasn't much talk about it in the early 2000s.  However, it seems to be back, and is a quickly growing technology.  I am not 100% sure why VR is making this strong comeback, perhaps it has something to do with accessibility though products like Google Cardboard.

There is so much talk about VR in world of CAD, and it is a little intimidating to try to figure out how to get started.  For years, rendering a CAD model in Inventor Studio, Showcase, or 3DS Max was the end goal for getting a rendering for customer presentations, web sites, etc.  However, I am seeing a push to VR for customer presentations and renderings.  Autodesk makes products like VRED and Stingray that enable users to create high-end VR experiences.  Those are both great products with a lot of great capabilities.  However, both require time and effort to learn.

Over the last few months, I have learned to create Stereo Panoramas using a variety of models from Autodesk software, such as Inventor, Fusion 360, Revit, and InfraWorks 360.  I would classify Stereo Panoramas as entry level VR.  They are immersive and require very little effort beyond the 3D model that you already have.  However, they do have their limitations, such as, they are a static image and offer no interaction with the model.

Depending on the product your 3D model was created in, you will have different ways to create a stereo panorama.  If you created a 3D model in Revit, AutoCAD, or Fusion 360, you can create views of the models, or cameras, then you can reprocess the render in the cloud as a stereo panorama.  If you are modeling in Inventor, InfraWorks 360, or other Autodesk product.  Your model can be Appended to a Navisworks model.  From Navisworks, you will be able to render your model in the cloud as a stereo panorama.

Here is the workflow for Inventor


Here is the workflow for InfraWorks 360


Here is the workflow for Revit


If the purpose of the render is to share the model with potential customers, a QR code can be generated, which will allow them to view the stereo panorama on their cell phone, with the help of Google Cardboard type device.  In a competitive environment, offering this type of conceptual model can be a key differentiator.

Here is how to share rendered Stereo Panoramas

Here are some samples of Stereo Panoramas from various Autodesk products.


Wednesday, January 4, 2017

As-Built Verification with ReCap 360

Some months ago, MESA was asked to do some as-built drawings for a customer that had us do the original assembly modeling in Inventor.  I saw this as a great opportunity to bring together the original model with a ReCap point cloud.  Through the process, I learned a few valuable lessons about the process and feel this is a good opportunity to share those lessons.

The first step in the process was to take the photos of the equipment.  From all my previous work with ReCap I knew that we wanted to take pictures from around the model, making a ring around the equipment, and pictures from different elevations.  One of my co-workers, Mike has a nice camera, so we got a ladder and started photographing the model.  We knew that ReCap has a limitation of 250 photos per model, and by chance, Mike took exactly 250 photos.

I took the photos and began creating the model.  I used a few measurements to ensure that the model would be scaled properly.  Looking at the point cloud from my first attempt, I was surprised that it seemed to have an issue with the back of the machine.  After thinking about it for a while, I realized why.  The decal on the front and back of the tank are the same, and since the tank is symmetrical, ReCap interpreted some of the photos of the back of the tank as being from the front.

My remedy to this was to split the photos into two groups, Group #1 was photos from the front and the two ends.  Group #2 was photos of the back and two ends.  So, then I was able to create point clouds for both portions of the equipment.  At that point, I had two options, create one ReCap project bringing in both the front and back point clouds, or bring both into the Inventor model.  I chose to bring them both into ReCap because that gave me the ability to create regions of points, which can be used to turn off unnecessary points.

Once all of that was done, I was ready to bring the point cloud into an Inventor assembly I created for the purpose of comparing the Inventor model to the point cloud.  I discovered something when I did this that I did not anticipate.  Even though, I had the model scaled properly and had the origin where I wanted, my point cloud was not flush to the origin the way I had hoped.  There are ways to tweak the point clouds orientation in Inventor, but the method of doing this was tedious to say the least.  I could perform some measurements to see how many degrees I needed to rotate the point cloud around its origin, then repeat for another axis, only to find that the previous axis would need adjusted.

The solution to this was to take better control of the orientation of the point cloud when registering points in the photos.  Instead of just assigning an origin point, I could give coordinates to the four corners of the equipment.  Doing this will improve the orientation of the point cloud and provide the scaling information for the point cloud as well.

With all of these lessons learned, I was able to develop a good workflow for bringing all of this together.

 Here is a Screencast that shows how to register the photos with the coordinate points.


Here is a Screencast that shows how to use Regions to clean up the data before bringing it into Inventor.


Here is a Screencast that shows how to bring the Inventor model together with the point cloud.


The workflow to perform the As-Built verification is not difficult, but if you follow this process, it will become easier.


Monday, December 19, 2016

Inventor Guided Tutorials

Over the last couple of years, Autodesk has initiated a move to slow down in-house training and support content and began encouraging users help their fellow users.  The Discussion Forums have been around for a really long time, and will always be a great way to get help.  A few years ago, Autodesk launched Screencast.  I describe Screencast as Autodesk's version of YouTube.  They then created the Autodesk Knowledge Network, by merging the forums with Screencast and adding the ability for users to write articles of their own.  With the release of Inventor 2017.3, Autodesk added another tool to that toolbox.  In Inventor 2017.3 users can now create their own guided tutorials.  


As an instructor, I immediately saw this as great way to transfer knowledge.  I just created my first Guided Tutorial, and it couldn't be easier. To be honest, previous versions of Inventor could do this, but it wasn't easy.  Autodesk knew how difficult it was, and have done a great job at making the process easy.


The process really starts outside of the software, with a planning stage.  It really is important to have a plan, or script.  I scripted out what steps a user would have to take to model the part in question.  That is important because the tutorial will be divided into Tasks, then into Steps.  Each task can have an overview Screencast attached. So my next phase was to record the Screencast videos for each Task.  It is worth noting that the tutorials look for a local WEBM file, so you will have to download the Screencast after recording them.  

After the planning and creating the Screencasts, it was time to dive into Inventor to create the tutorial. It is a very simple to create the Tasks and break them down into steps. I like how I can associate commands to each step, so if a user is not sure what to do next they can be prompted with highlighted commands. Each Task can have a starting file, which is helpful if users join a tutorial after a Task or two. This files can be uploaded, or Inventor can capture the file that is the current model in Inventor. I have not tried enough of these to say which is best. I think it is great that you can capture the current model, but I have a feeling that I will eventually transition to having a saved file for each Task to upload.

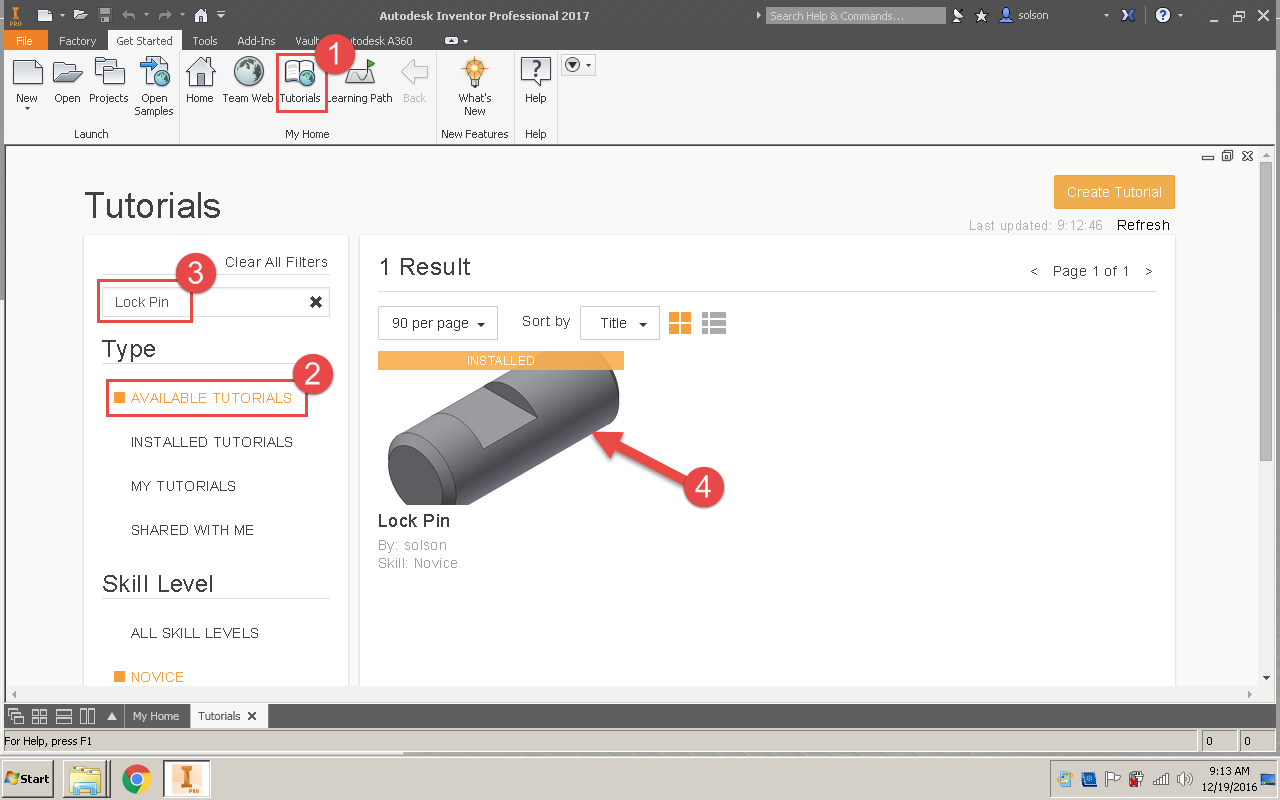
Once the tutorial is created, it can be shared publicly or privately, through A360. I shared my first effort publicly. Search for my tutorial by going to the tutorial page, inside Inventor 2016 or 2017, and search for "Lock Pin."


Autodesk continues to give users great ways to help the larger community of users around them. The Guided Tutorials are another great way to do this. I think it is a great training option whether that is training in general or for a company specific workflow. So I urge you to check them out.