So now that we understand that there is a difference and we have the necessary Vault Property, I want to explain how to create the mapping between our Vault Property and an Inventor iProperty. The only other prerequisite is that we have to have an Inventor file that has the desired iProperty, in most cases, this will be a Custom iProperty.
The example I use to demonstrate this is a property called Stock Location. It is the location in the warehouse that this part is stored. My Inventor file will have a custom iProperty named Stock Location and it will hold that value.

As long as you have one Inventor file with that iProperty definition, you are ready to map it to your Vault Property. Go to Vault and open the Property Definition dialog, select the property you want to map to, and click Edit.

Then on the Mapping tab of the edit dialog, you will be able to click on "Click here to add a new mapping." This will enable a row for you to define the mapping, each of these fields is a drop-down menu. I always start with the Provider column. Clicking in that cell will show a drop-down of all the different types of providers available. In our case, we will pick Inventor (.ipt, *.iam, *.idw, *.ipn, *.ide). Please note the other possible selections as well.

Then you will need to designate the File Property. In this case, Vault will want a sample file that it will pull property definitions from. It is capable of pulling from the Vault or from a local file, so make sure to pick the proper option based on where the sample file is stored. Then click "Import Properties" and pick the proper option.
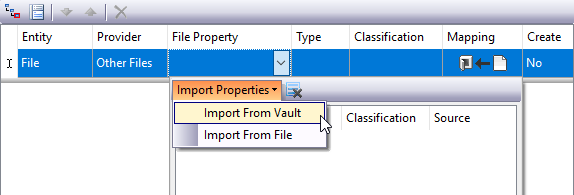
Then the user will be prompted to select the sample file and the File Property drop-down will be populated with all the properties defined in that file.

Then the user can select the desired property from the list. I do want to point out that Vault will retain that same list during this session of Vault, so if you want to map several properties to properties from the same sample file, you will only need to pick that sample file once. Also, if you pick a second sample file, this list will display both sets of properties. If this list gets too cumbersome because of adding several sample files, the icon next to "Import Properties" will clear the list.
There are two other options here that are good to understand. The Mapping will define if this is a bi-directional mapping or a one direction mapping. For a user-defined property, you will have several options. If you are mapping a Vault System Property to an iProperty, you will only be able to have Vault push its value to Inventor. This is because Vault System Properties are not editable by users. The "Create" option will tell Vault if it should create the property on the CAD file if it doesn't exist. Once all of the options have been selected and the user clicks out of that row, the mapping is defined and moved below the line in the Window.
It is possible to create multiple mappings on the same properties, if multiple mappings exist, it is possible to order, or prioritize them from greatest to least.

I will caution against creating too many mappings, I have talked to several customers recently that have cyclical, or conflicting, mappings and it resulted in undesired property behavior. So be careful when creating multiple mappings for the same property.
Also, just creating the mappings will not automatically cause the property to be populated with the data from the CAD file. Running a re-index on the Vault will prompt Vault to begin pulling the data from the mapped properties into the Vault database. If you don't perform a re-index, the mapping will be carried out as files are checked into the Vault.
Here is a YouTube video that shows the process.
That is all there is to it. Following these steps, you should be ready to start mapping all of your custom Inventor Properties to Vault Properties.
ReplyDeleteInteresting article! Thank you for sharing them! I hope you will continue to have similar posts to share with everyone.
Residence for Sale in Alanya Turkey