Over the last several months, I have really worked to learn all I could about Generative Design in Fusion 360. However, there are only so many tutorials and sample files that you can work on. I wanted to use Generative Design for a real design project, but my job doesn't always provide me opportunities to work on design projects. So I decided to create one of my own. I figured I could find some product I could use at home or work that I could redesign with Generative Design. I decided to use Generative Design to create a hook for me to hang up my laptop backpack.
In my home office, I really don't have a place for my laptop backpack. I was considering going out and getting a 3M Command hook, but I thought designing my own with Generative Design and 3D Printing the hook would be more fun.
When using Generative Design, we have to define several elements:
Preserve Geometry
Obstacle Geometry
Load Cases
Manufacturing Methods
Materials that we are considering making this design out of
Preserve Geometry
Preserve Geometry are solid bodies that will be part of the final design. For my hook, I figured that the preserve geometry would be the area around the two mounting holes and a lofted shape to hang my backpack on. Once identified as Preserve Geometry bodies, Fusion 360 will display them in green. Below is a screenshot of the preserves from my wall hook.
Obstacle Geometry
Obstacle Geometry are solid bodies that represent areas that the new geometry has to avoid. It can be mating components or an area that needs to be avoided. For my hook, I created a simple representation of the wall that the hook will be mounted on and the handle of my backpack that will hang on the hook. Fusion also has a specialized tool called Connector Obstacle. The purpose of this command is to create obstacles for mounting hardware and tool clearances. In my case, I used Connector Obstacles to represent the mounting screws and the necessary clearance to allow a screwdriver to place the screws. Once identified all Obstacle Geometry will be displayed as red. Below is a screenshot of the obstacles from my wall hook.
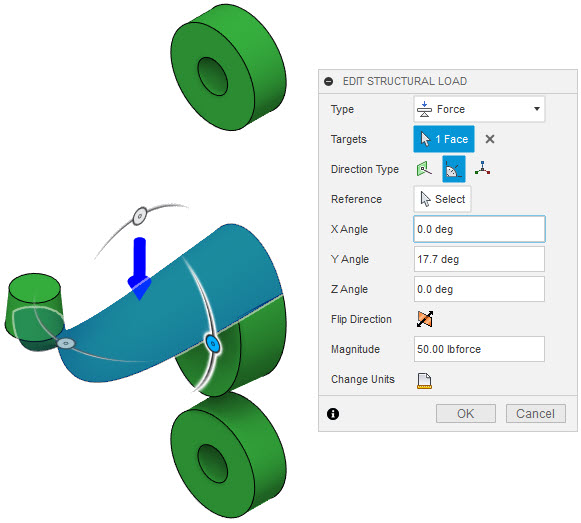
Load Cases
The Generative Study will need one or more load cases defined. These contain structural loads and constraints that represent the forces that the part will encounter in the real world. In this study, I have one Load Case. My constraints are fixed constraints that will hold the part to the wall. I have two loads, one of which is gravity. The other is a static force on the surface that the bag will be hanging from. Initially, I weighed my backpack to get the force accurate to reality. I used 15 pounds. My first few attempts to solve the study failed. I realized that the force was too small for Fusion 360 to solve the study, so I upped the value to 50 pounds. This will over-engineer the part but isn't necessarily a bad thing in this case.
Manufacturing Methods
Generative Design is capable of creating parts with several different manufacturing methods in mind. The idea behind this project was to create something with Generative Design and follow it all the way through to a physical product. With this product, I figured 3D printing or 3-axis milling would be the best methods. I don't have access to either type of machine, however, I figured it would be easier to find someone to 3D print the part for me, so I chose that method. There are a couple parameters that will be considered when using Additive. We can evaluate different build directions as well as account for Overhang Angle and Minimum Wall Thickness. When picking orientations, you need to consider the X, Y, and Z orientation of the model. In my case, I used Y+ and Y- because the back face of my part is flat and is on the XZ plane.
Materials
Since I chose 3D printing as the manufacturing method, I should pick a material that can be used in 3D printing. PLA is one of the most common materials for 3D printing but is not in the Material library. I could find the material properties of PLA and use those to define PLA in Fusion 360. Another option would be to pick a different material. ABS is part of the material library, so I chose to use that material for this study.
After all of the criteria are identified and entered, it is just a matter of solving the study. Depending on how many Load Cases, Manufacturing Methods, and Materials I choose, Fusion 360 could take a couple hours to fully solve the study. However, the software will display iterations of the solutions as they are completed. In my case, it didn't take long to solve my Generative Study, since I only had one Load Case, one Manufacturing Method, and one Material.
As the results are displayed, you can look through the possible designs and different attributes of each. As you find designs that you want to further evaluate, you can export them to their own design. My first time through, I ended up getting this.
I realized that I over-designed the hook portion, which was identified as a preserve. I decided to modify the preserved section of the hook and ended up getting this.
I think this came out looking pretty cool and I am excited to get this 3D printed. Check back here in a few weeks after I have a chance to get this printed because I plan on creating a post related to the 3D printing of this part.
If you want to see me walk through the design, here is a video that walks through the process.